Settings
Let's first start by setting up Eventmie Pro global settings. We're starting from Admin Panel, so that we can set some initial data before moving on to the front-end.
{primary} To visit Settings, log in as Admin and then
Admin Panel -> Settings
{warning} Please read the guidelines provided below each setting, and follow exactly mentioned.
- Site
- SEO
- Social
- Contact
- Booking
- Multi-Vendor
- Admin
- Apps
- Payment Methods
- PayPal
- Offline Payment
- Regional
Site
Setup website brand identity.
| Setting Name | Type | Description |
|---|---|---|
| Site Name | text |
brand name |
| Site Slogan | text |
Tagline |
| Site Logo | image:jpg|jpeg|png |
Logo |
| Site Favicon | image:jpg|jpeg|png |
Favicon/icon |
| Extra Footer Credits | rich-text |
Change footer credits |
SEO
Set website's global SEO meta tags.
| Setting Name | Type | Description |
|---|---|---|
| Meta Title | text |
short title explaining your business |
| Meta Keywords | text |
comma separated unique keywords that describe your website in-short |
| Meta Description | text |
short description of your website |
Social
About your social-media existence.
| Setting Name | Type | Description |
|---|---|---|
| Facebook Page Username | text |
Facebook page username only |
| Twitter Account Username | text |
Twitter account username only |
| Instagram URL | url |
Instagram profile URL |
| Linkedin URL | url |
Linkedin profile/company URL |
Contact
Contact details
| Setting Name | Type | Description |
|---|---|---|
| Address | text |
office address |
| Phone | number |
office phone number |
email |
office email | |
| Google Map Lat | coordinates |
Google map coordinates Lat of your office address |
| Google Map Long | coordinates |
Google map coordinates Long of your office address |
Booking
Bookings & Events global settings.
| Setting Name | Type | Description |
|---|---|---|
| Pre Booking Time | number |
total number of hours before, a customer can book an event |
| Pre Cancellation Time | number |
total number of hours before, a customer can request Booking Cancellation |
| Hide Expired Events | enable/disable |
Show/Hide expired events on event listing page |
| Max Ticket Qty Limit Per Order | number |
Set Max ticket quantity limit to be purchased in a single order. WARNING: keep it under 100 |
| Allow Offline Payment For Organizer | enable/disable |
Enable/Disable offline payment method for Organizers |
| Allow Offline Payment For Customer | enable/disable |
Enable/Disable offline payment method for Customers |
| Disable Booking Cancellation | enable/disable |
Enable/Disable booking cancellation option for Customers |
| Disable Ticket Download | enable/disable |
Enable/Disable download ticket option for Customers |
| Disable Google Calendar | enable/disable |
Enable/Disable Google Calendar option for Customers |
{primary} Admin can always make a booking via the Offline Payment method.
Multi-Vendor
Switch between Multi-vendor mode
| Setting Name | Type | Description |
|---|---|---|
| Multi Vendor | enable/disable |
turn on or off the multi-vendor option |
| Admin Commission | number |
set your commission in (%) percentage. (must be positive value) |
| Verify Email Before Login | enable/disable |
If enabled, users will need to verify email after signup |
| Publish Event After Admin Approval | enable/disable |
If enabled, the event will go live only after Admin approval |
| Manually Approve Organizer | enable/disable |
If enabled, the Customer can Become Organizer only after Admin approval |
{info} Read more about Organizer Manual Approval Process here Organiser Manual Approval 👈
Admin
Admin panel content settings
| Setting Name | Type | Description |
|---|---|---|
| Admin Background Image | image:jpg,jpeg,png |
admin login page background image |
| Admin Title | text |
admin login page title & header title |
| Admin Description | text |
admin login page sub-title |
| Admin Loader | image:jpg,jpeg,png |
admin login page sub-title |
| Admin Icon Image | image:jpg,jpeg,png |
admin panel logo |
Apps
External Apps credentials
| Setting Name | Type | Description |
|---|---|---|
| Google Client ID | string |
Google OAuth client id |
| Google Client Secret | string |
Google OAuth client secret |
| Google Map Key | string |
Google Map Key |
| Facebook App Id | string |
Facebook OAuth app id |
| Facebook App Secret | string |
Facebook OAuth app secret |
| PayPal Client Id | string |
Paypal client id (New Rest API) |
| PayPal Secret | string |
Paypal secret (New Rest API) |
| PayPal Production Mode | enable/disable |
Turn on/off production (real) mode payments |
Payment Methods
Eventmie Pro comes with PayPal express checkout system and Offline Payment method.
{success} In the case of Free tickets, users can book tickets directly without going through the payment gateway.
-
Admin - Can only use the Offline Payment method to make bookings for customers.
-
Organizer - Can use PayPal & Offline Payment method to make bookings for customers.
-
Customer - Can use PayPal & Offline Payment method to make bookings for themselves.
{primary} We've excluded PayPal for Admin, because, it does not make any sense to pay yourself. 🤑
PayPal
To get started with PayPal, simply-
- Go to
Admin Panel -> Settings -> Apps Tab. - Add your PayPal account
Client Id&Secret. - Add the Callback URL to your PayPal account-
<yourwebsite.com>/bookings/paypal/callback. - Then, first, keep the
PayPal Production Modedisabled, and make a test booking. - If test booking successful, enable the production mode to start receiving real payments.
Follow these steps to setup PayPal client ID and Secret.
-
Setup PayPal Sandbox for Test payment-
-
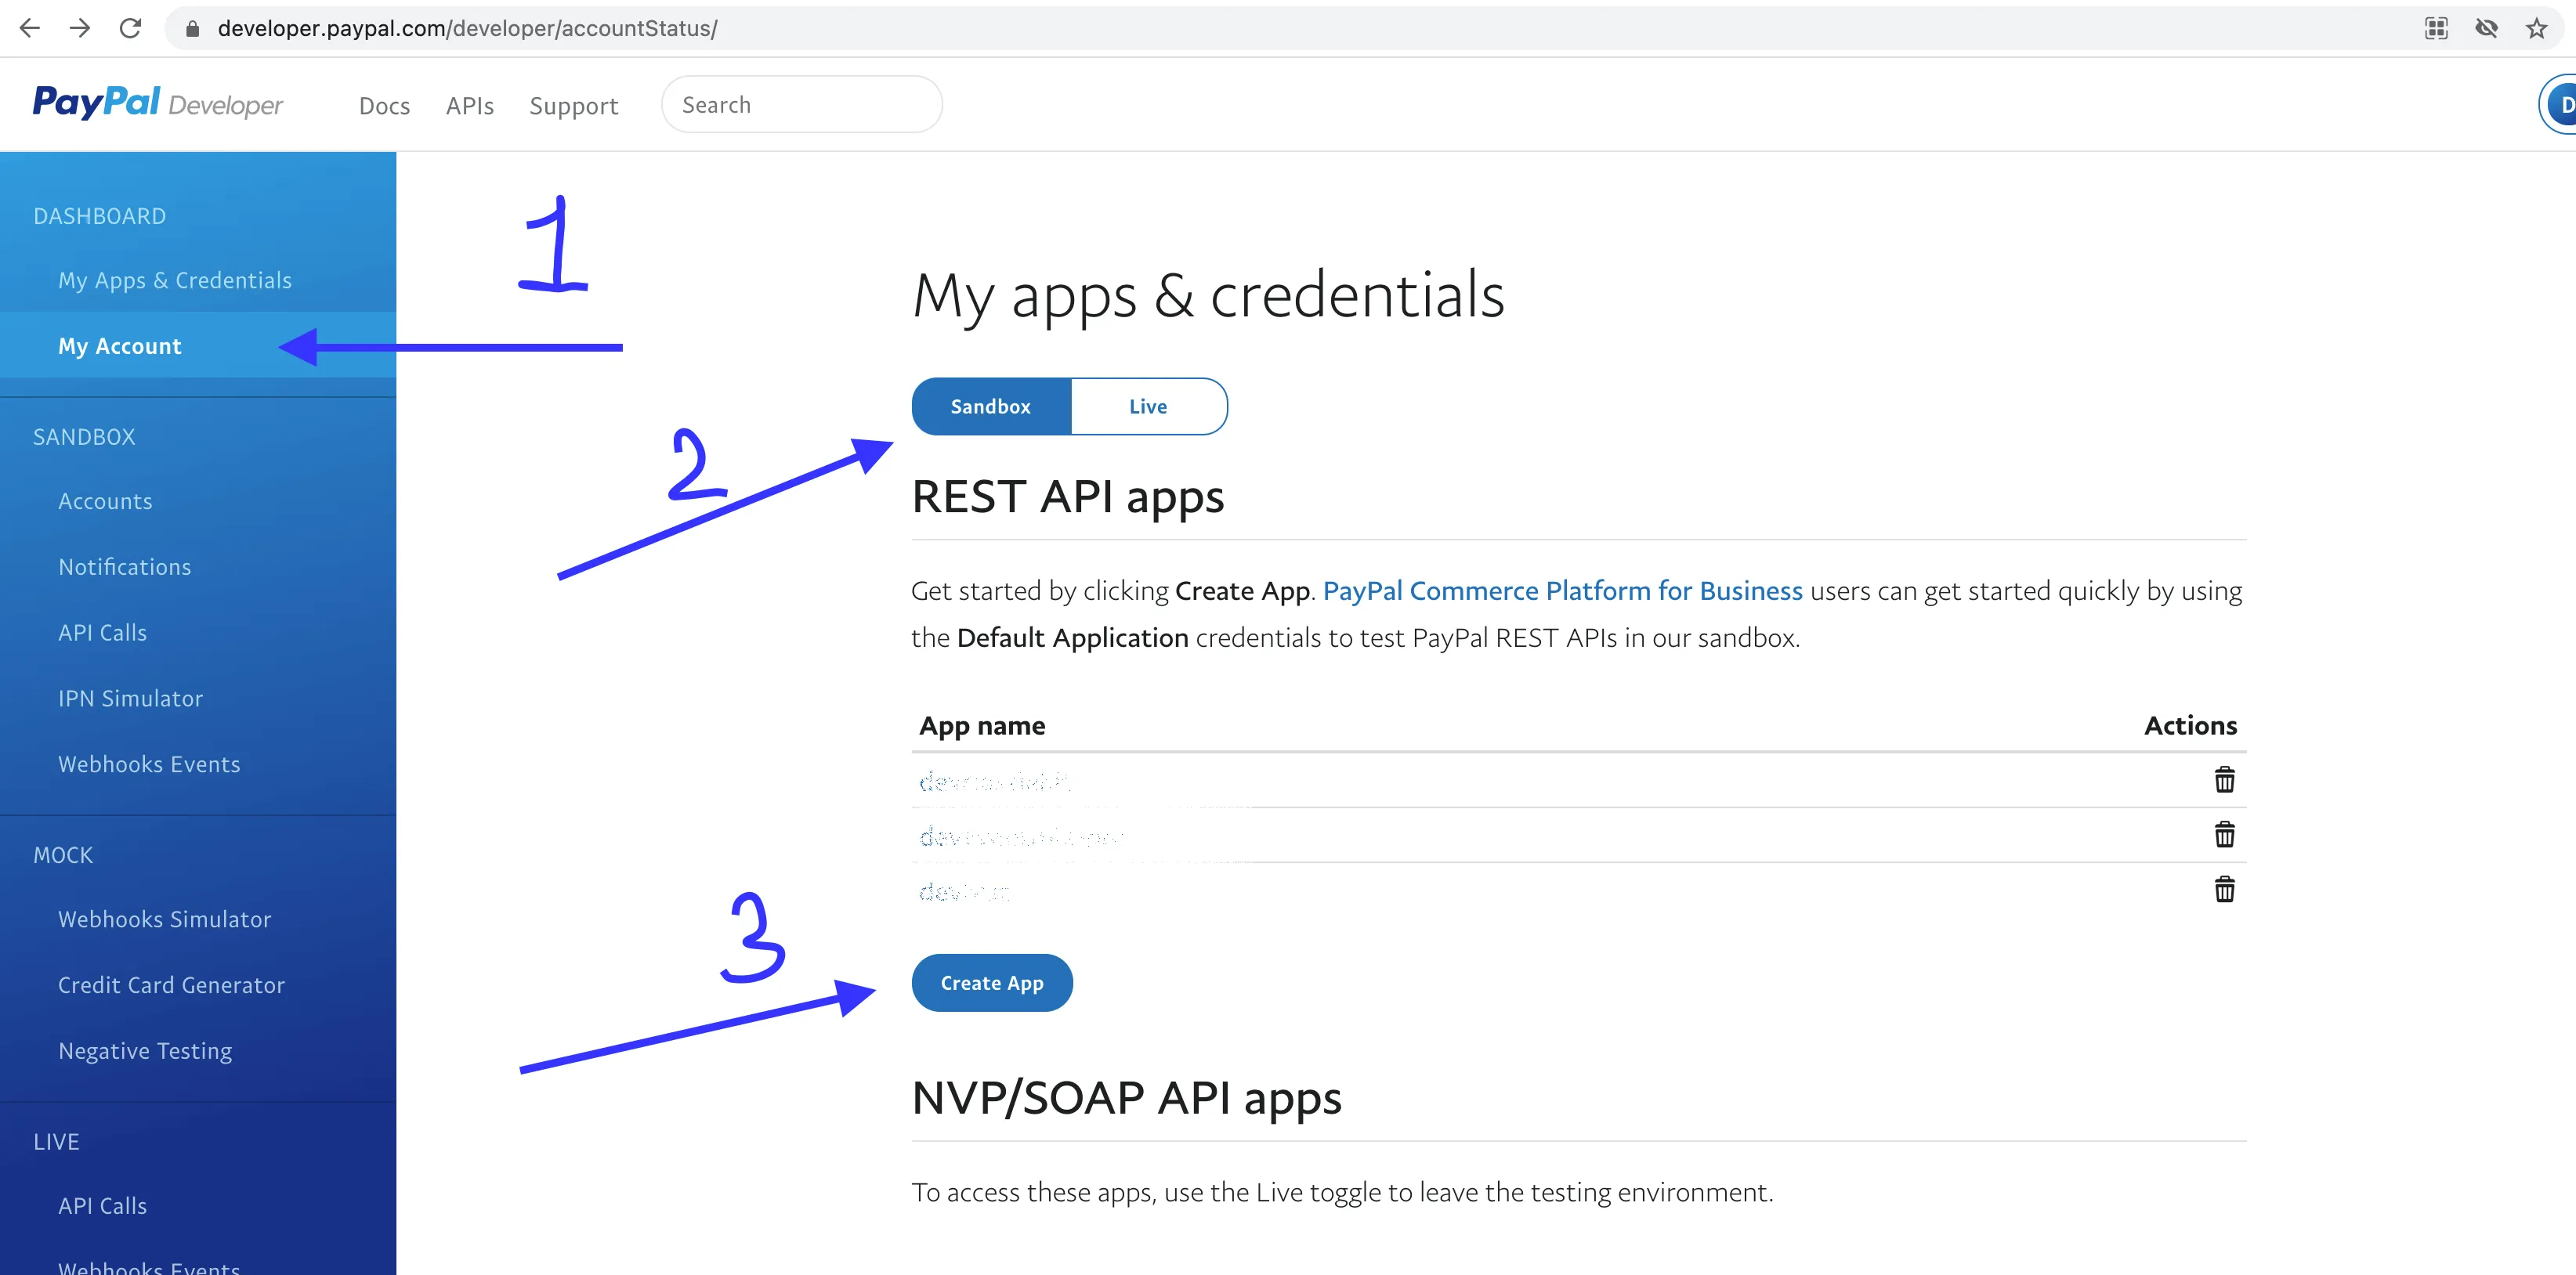
Login into your PayPal account and visit PayPal Developer Dashboard
-
Click on Sandbox and then click on Create App
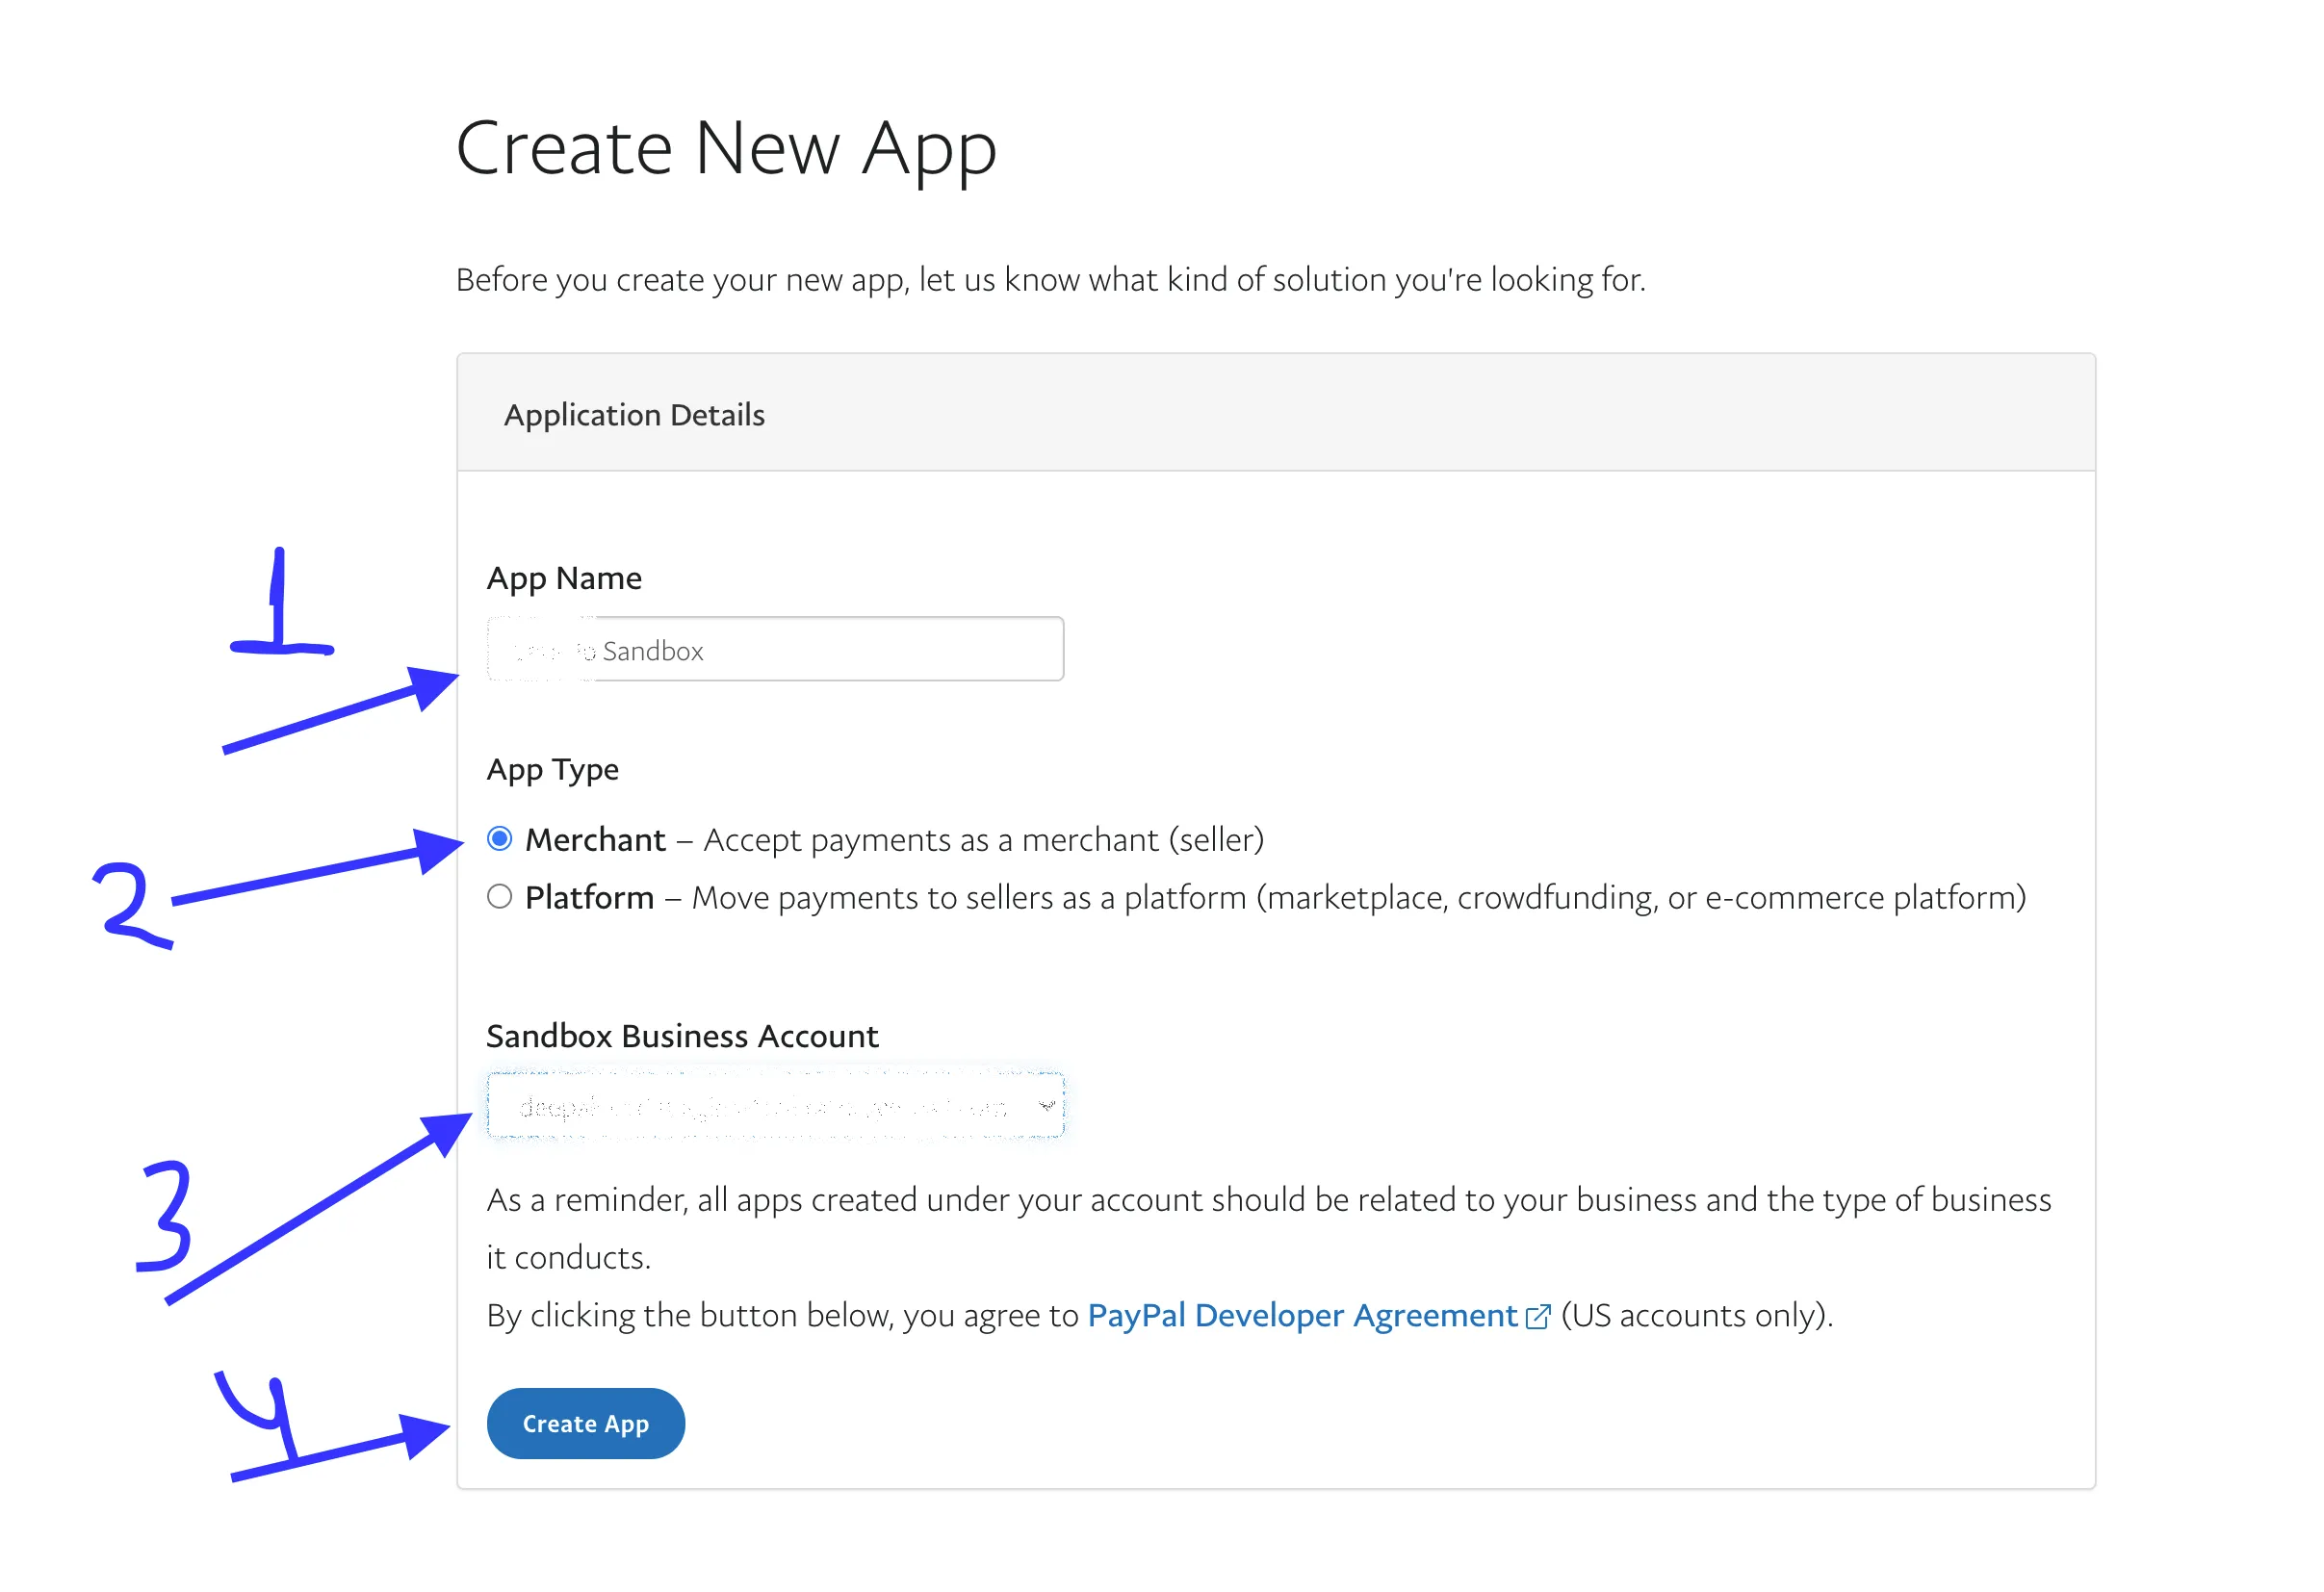
- Enter the App Name e.g Example Sandbox, select App Type as Merchant and keep the Sandbox Business Account as is and click Create App.
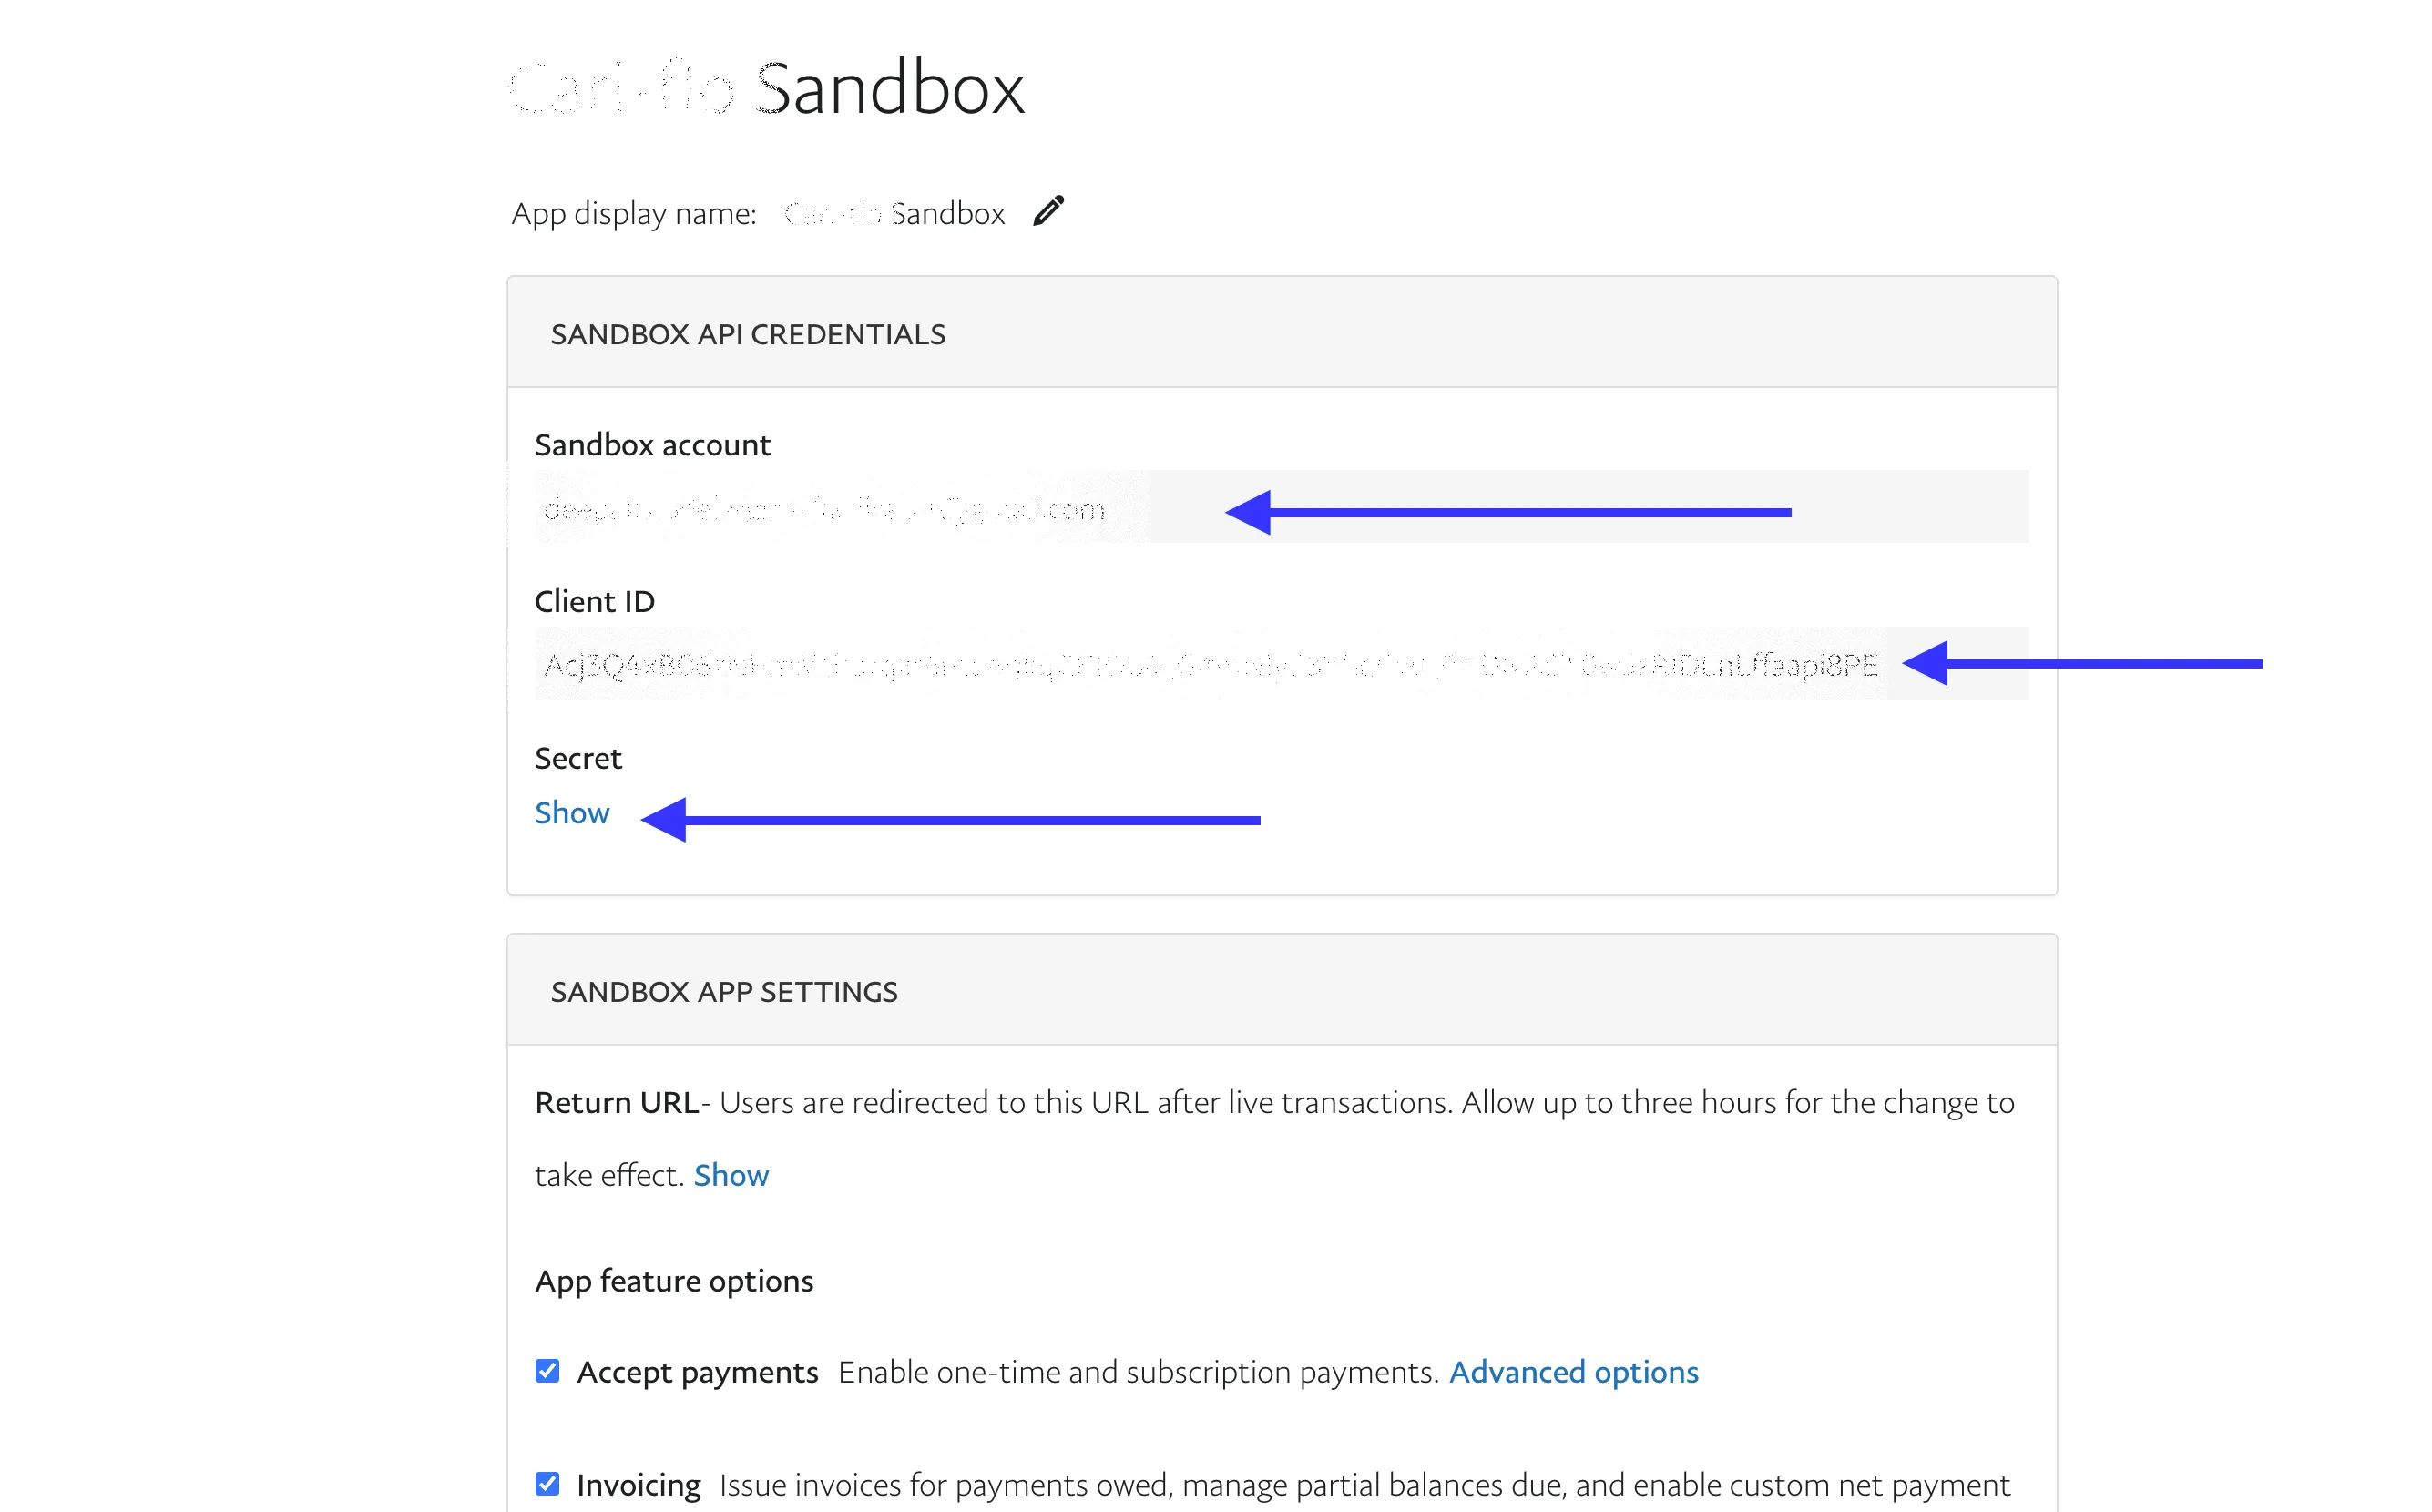
- Copy Client ID & Secret and go to your event website Admin Panel → Settings → App and add those credentials in PayPal client ID and PayPal secret and keep the Production Mode Off as these are sandbox (testing purpose) credentials
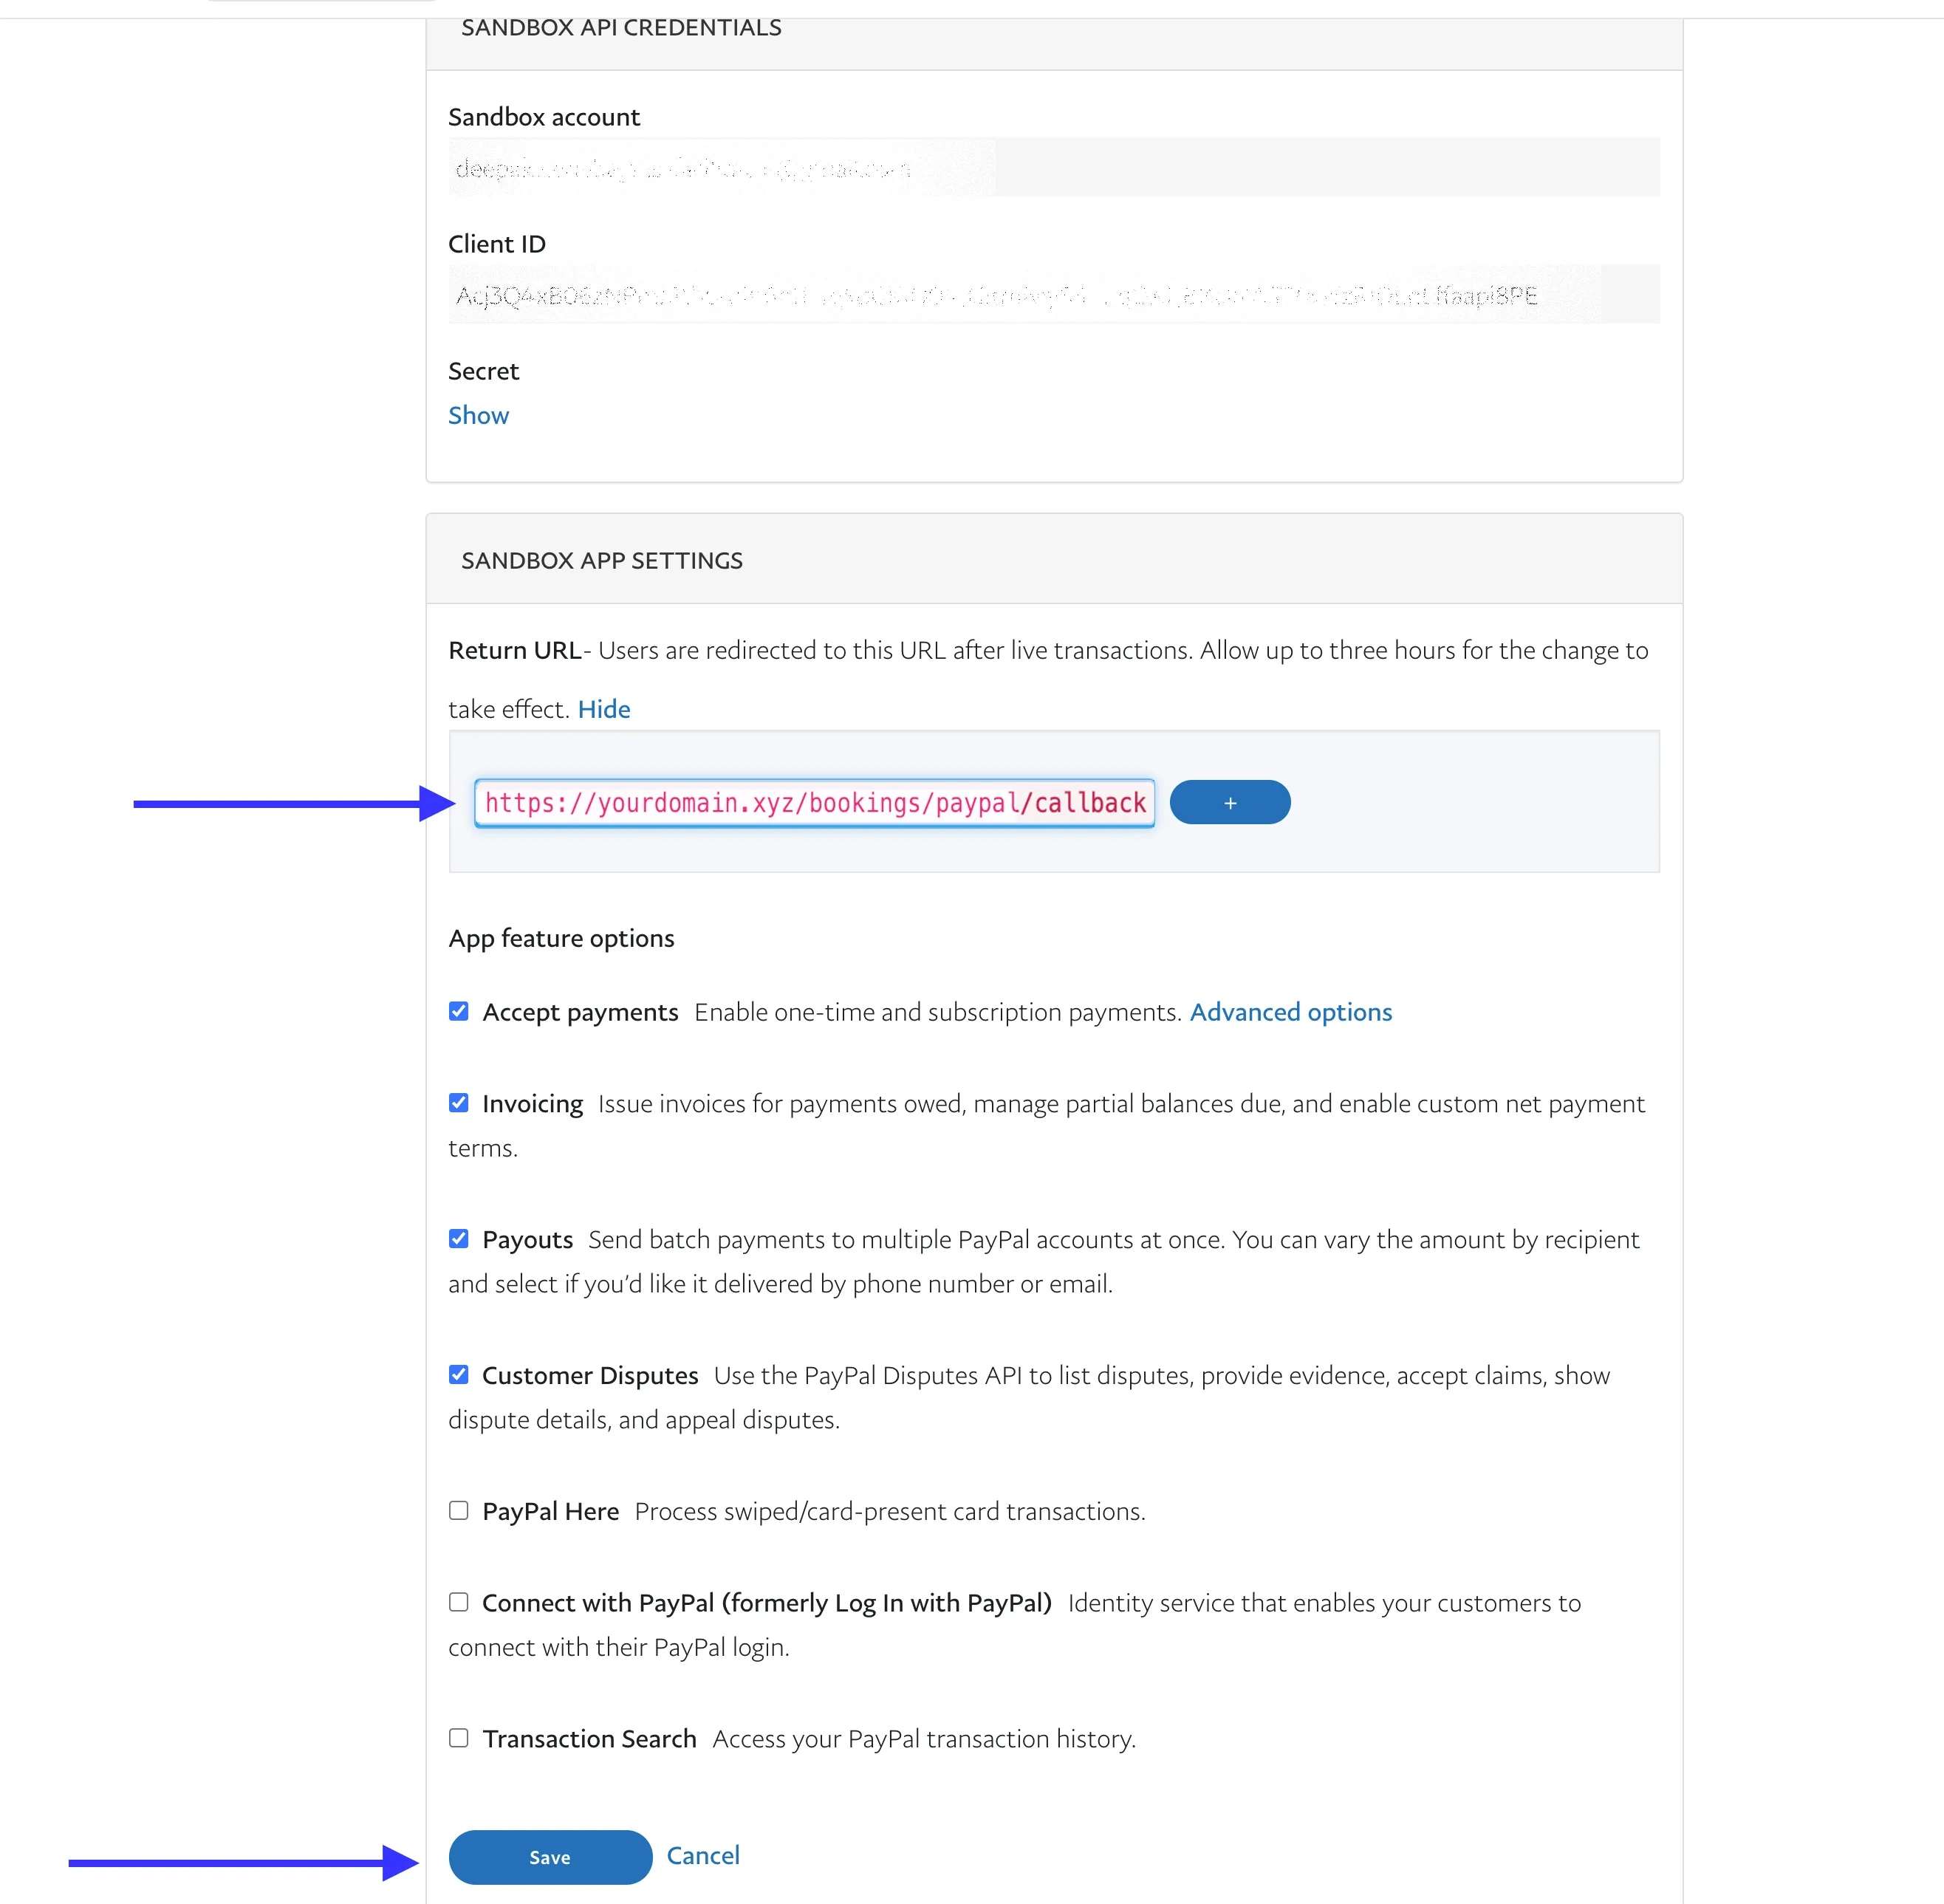
- Last step, copy the PayPal Callback URL from Admin Panel → Settings → App and go to PayPal again, and paste it in the Return URL and finally click Save
-
-
Setup PayPal Live (production) for Live payment-
-
Visit- PayPal Developer Dashboard
-
This time, select Live and click Create App
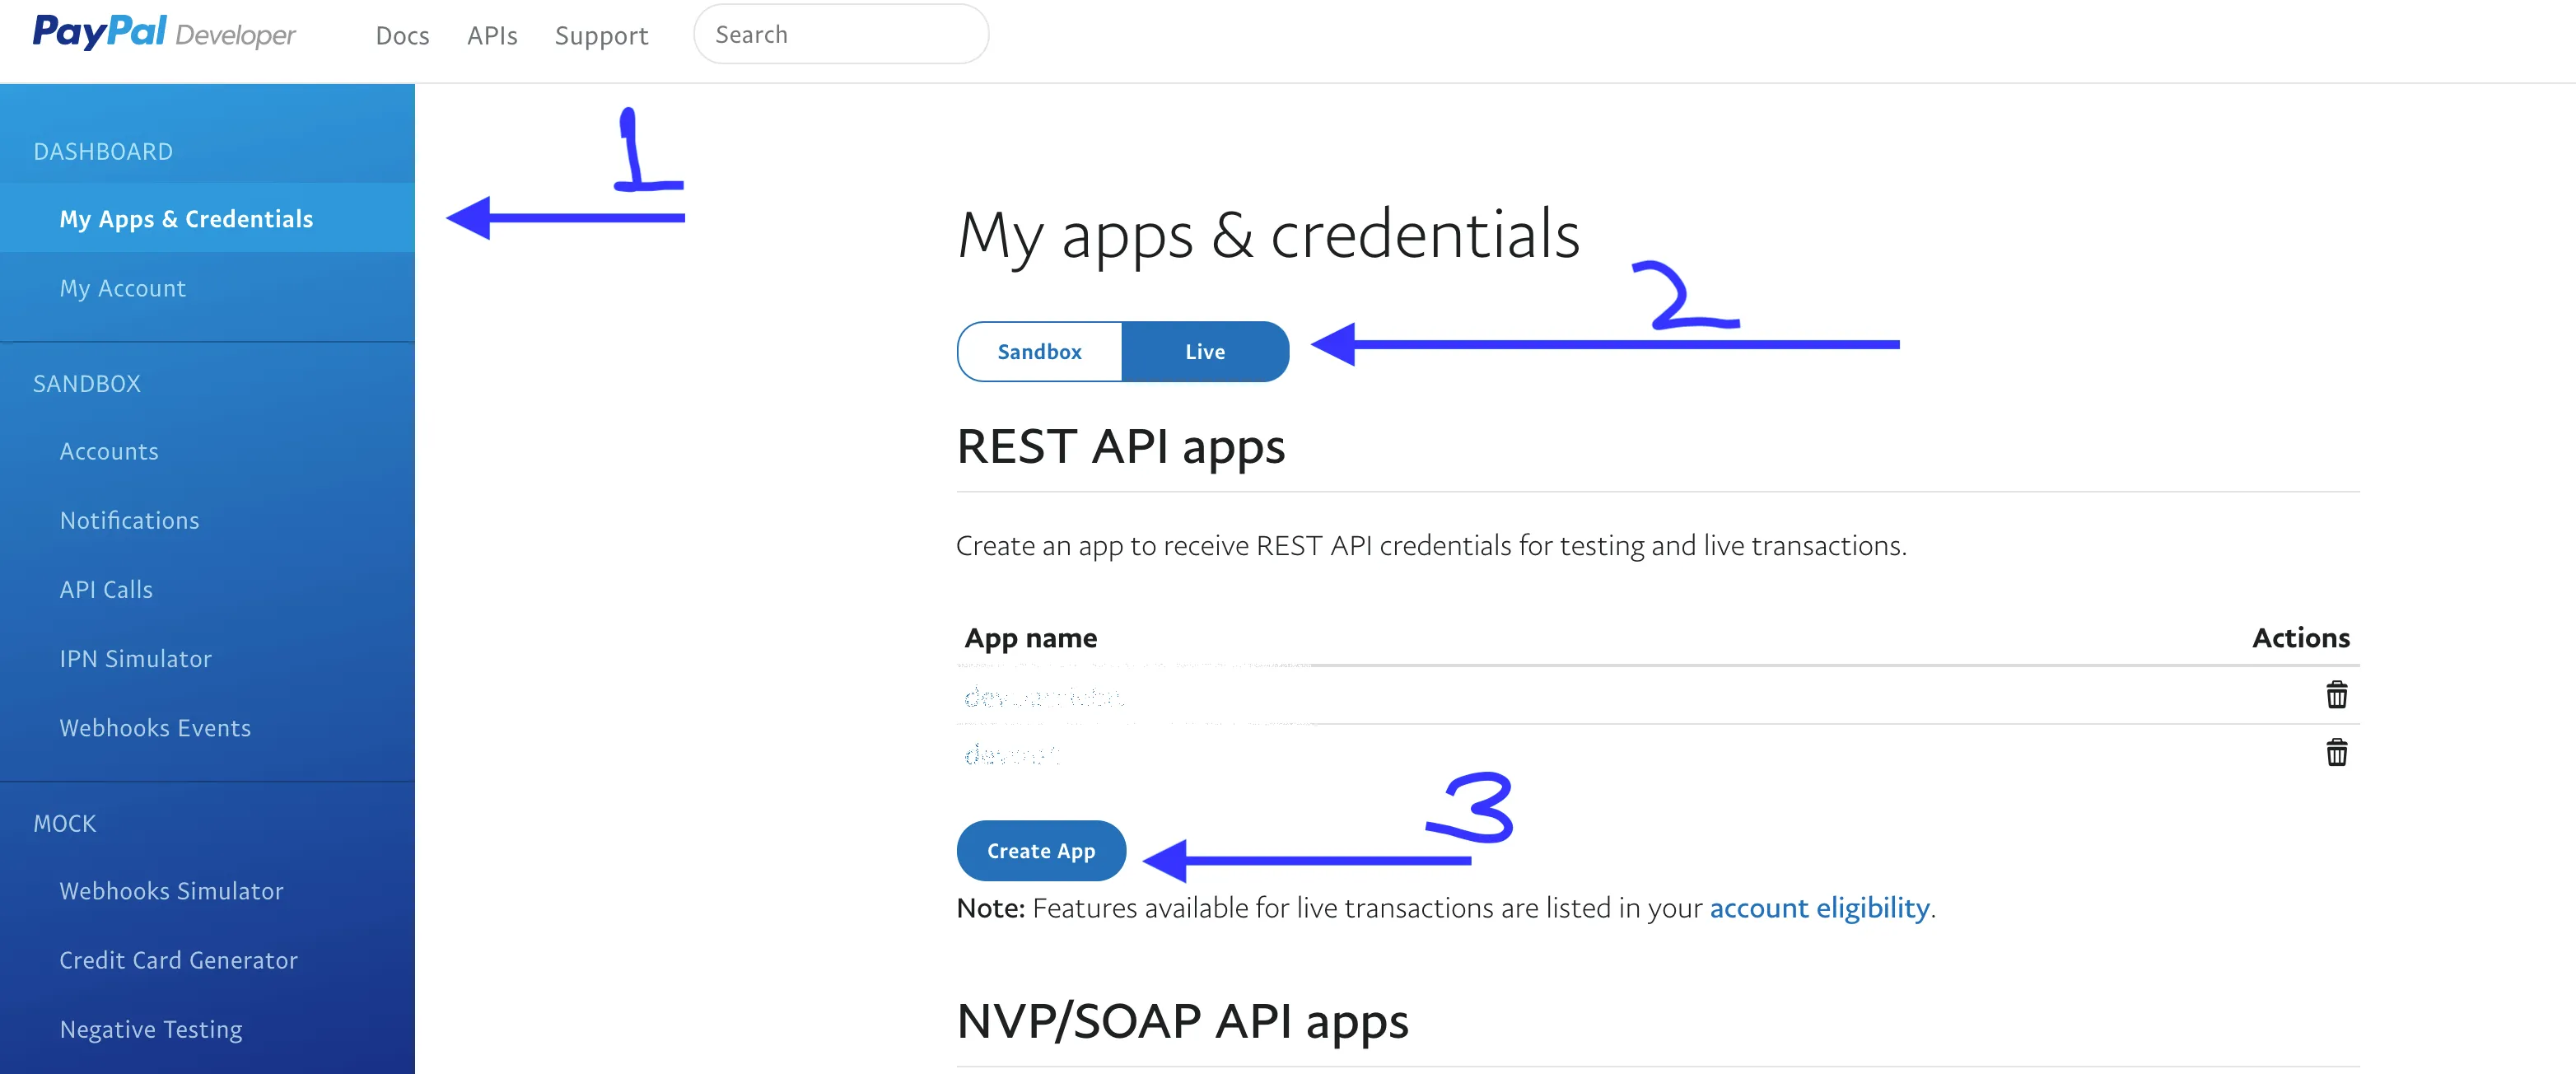
- Enter the App Name e.g Example Live and click Create app
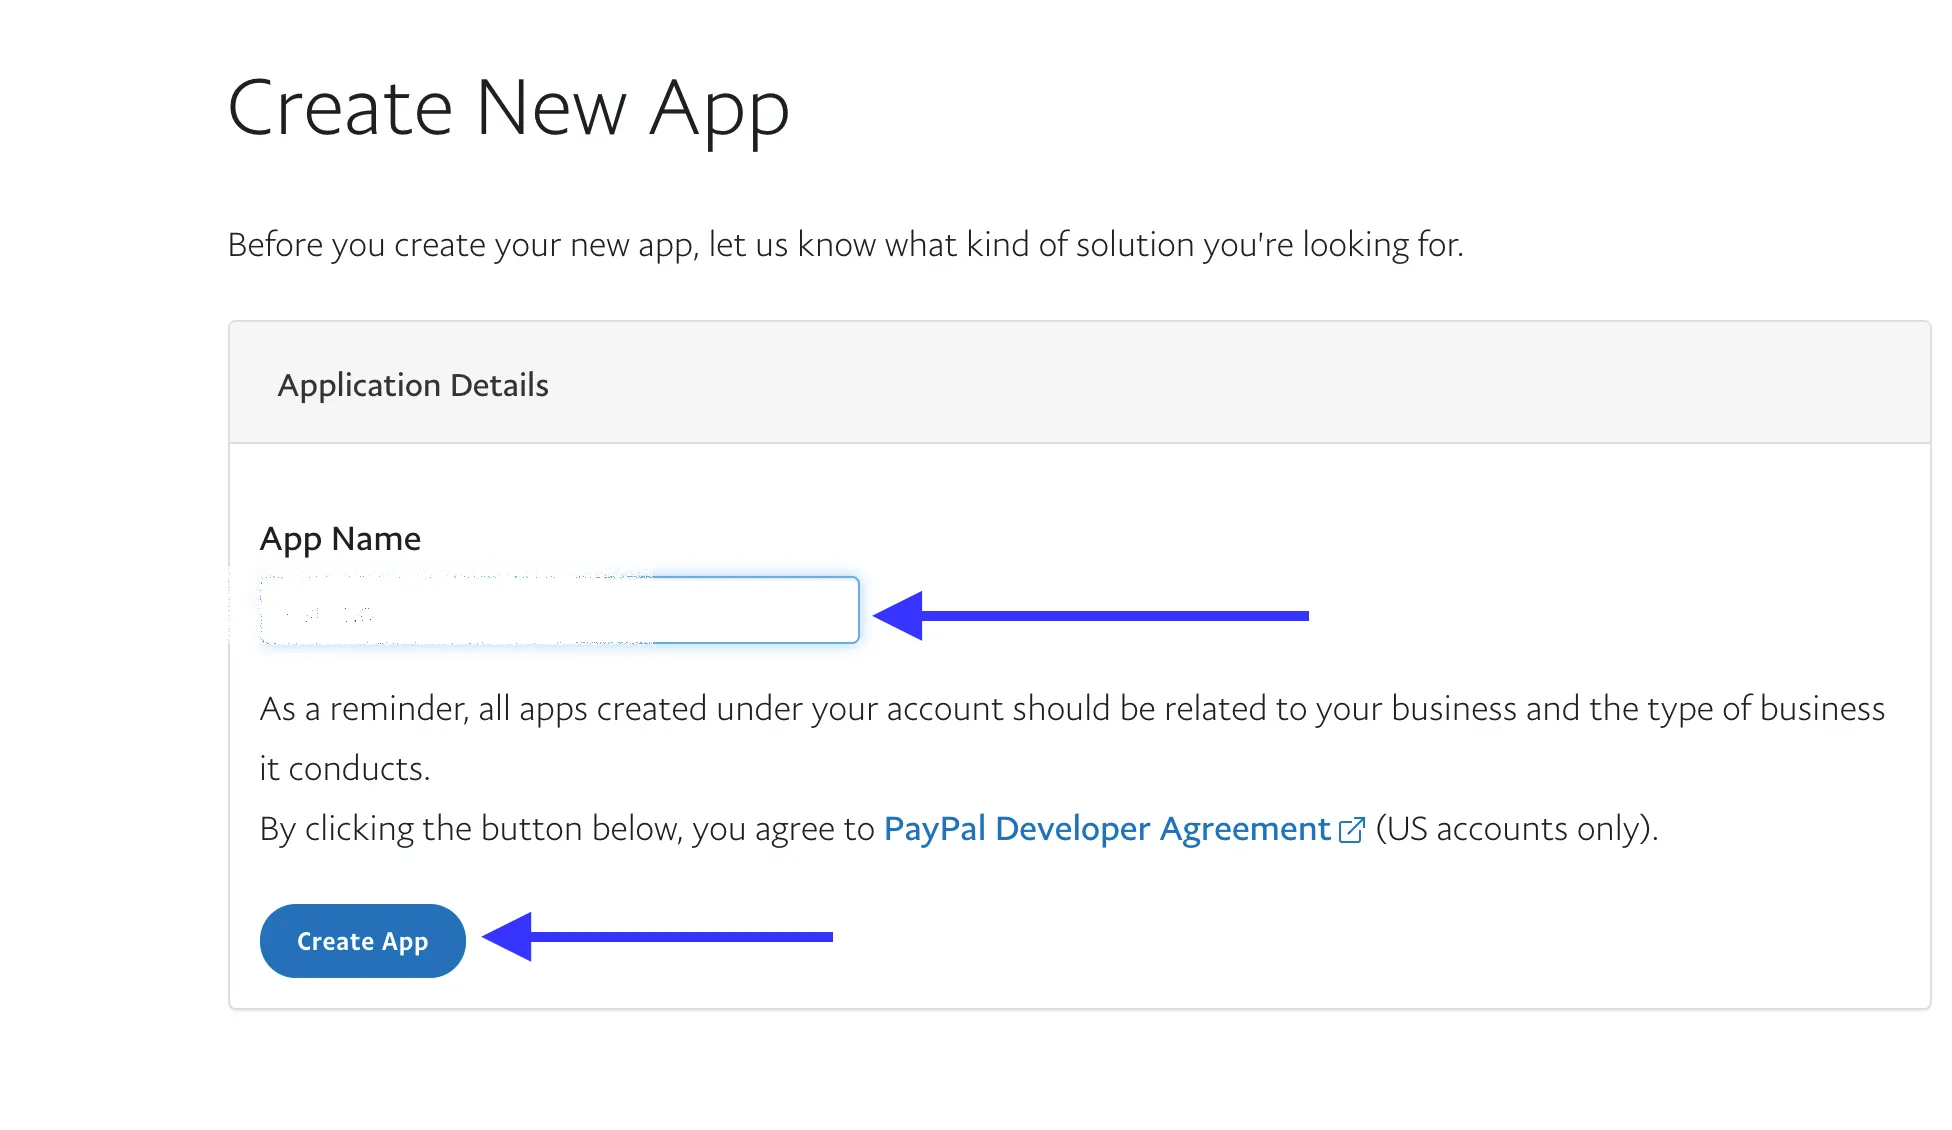
- Enter the same Callback URL, and check the mentioned checkboxes and click Save
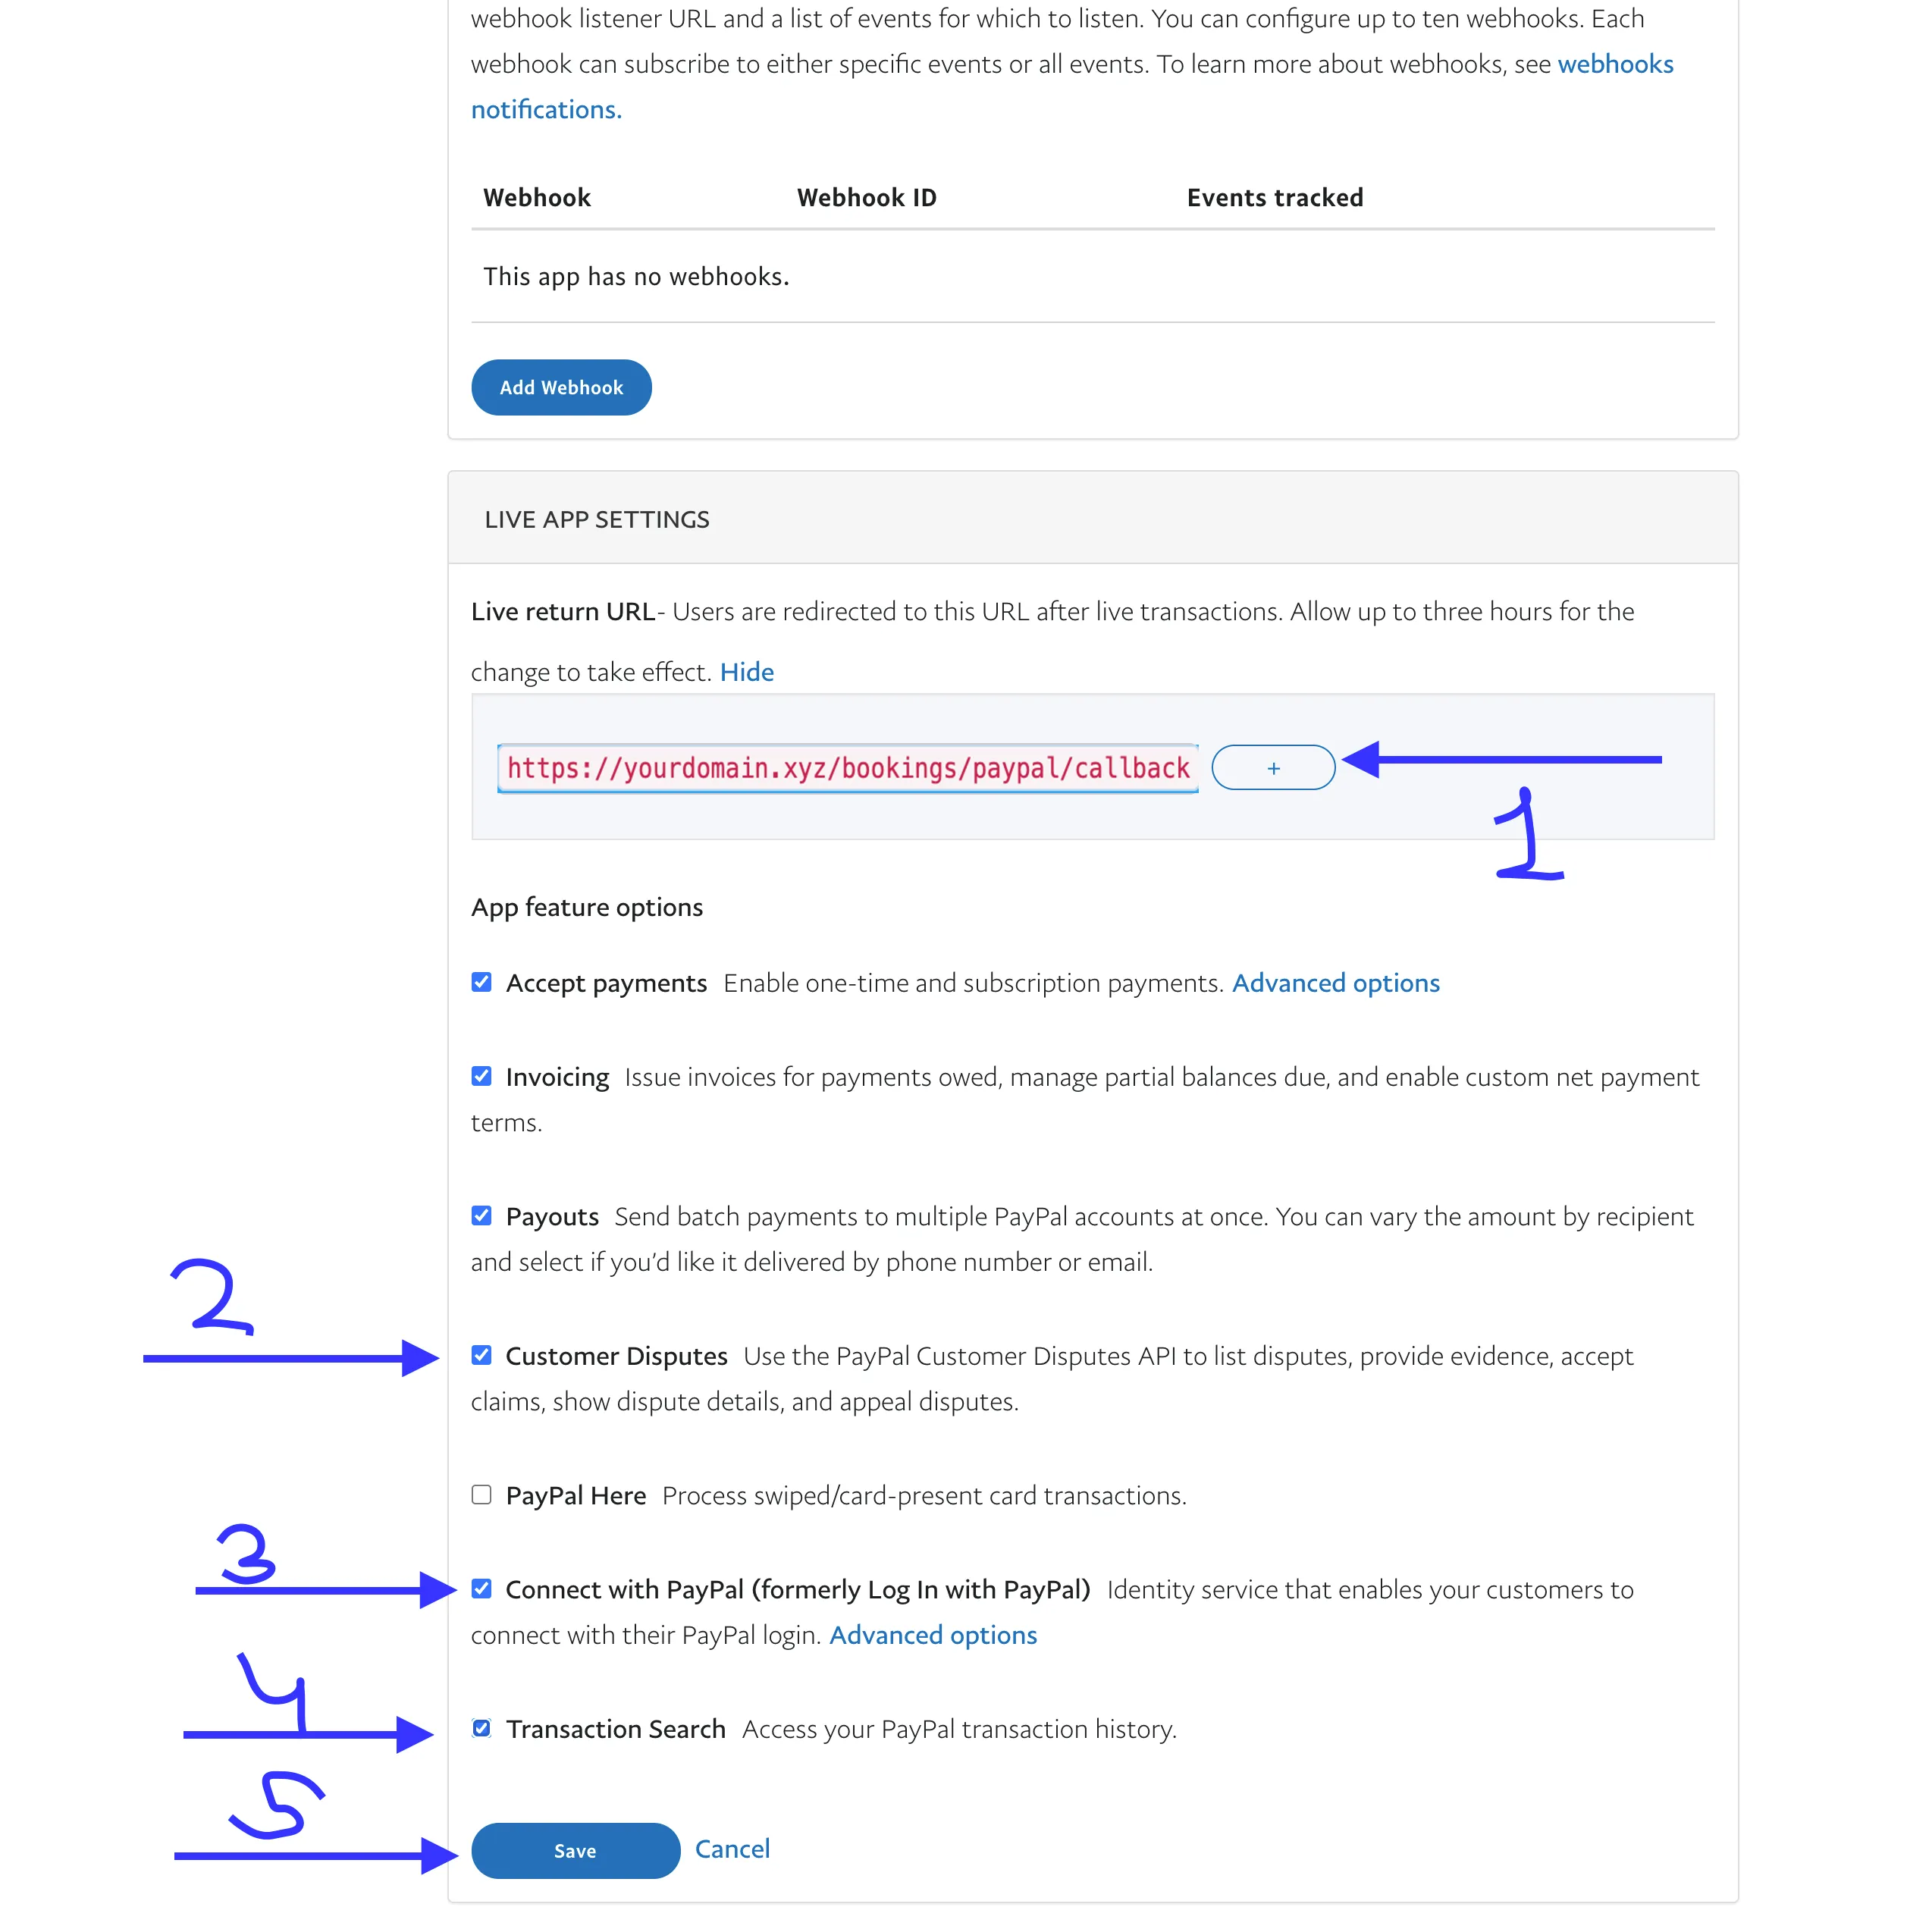
- Now finally, copy the Live App Client ID & Secret and go to Admin → Settings → Apps and Enter them in the PayPal Client ID & Secret and this time, turn the Production Mode On
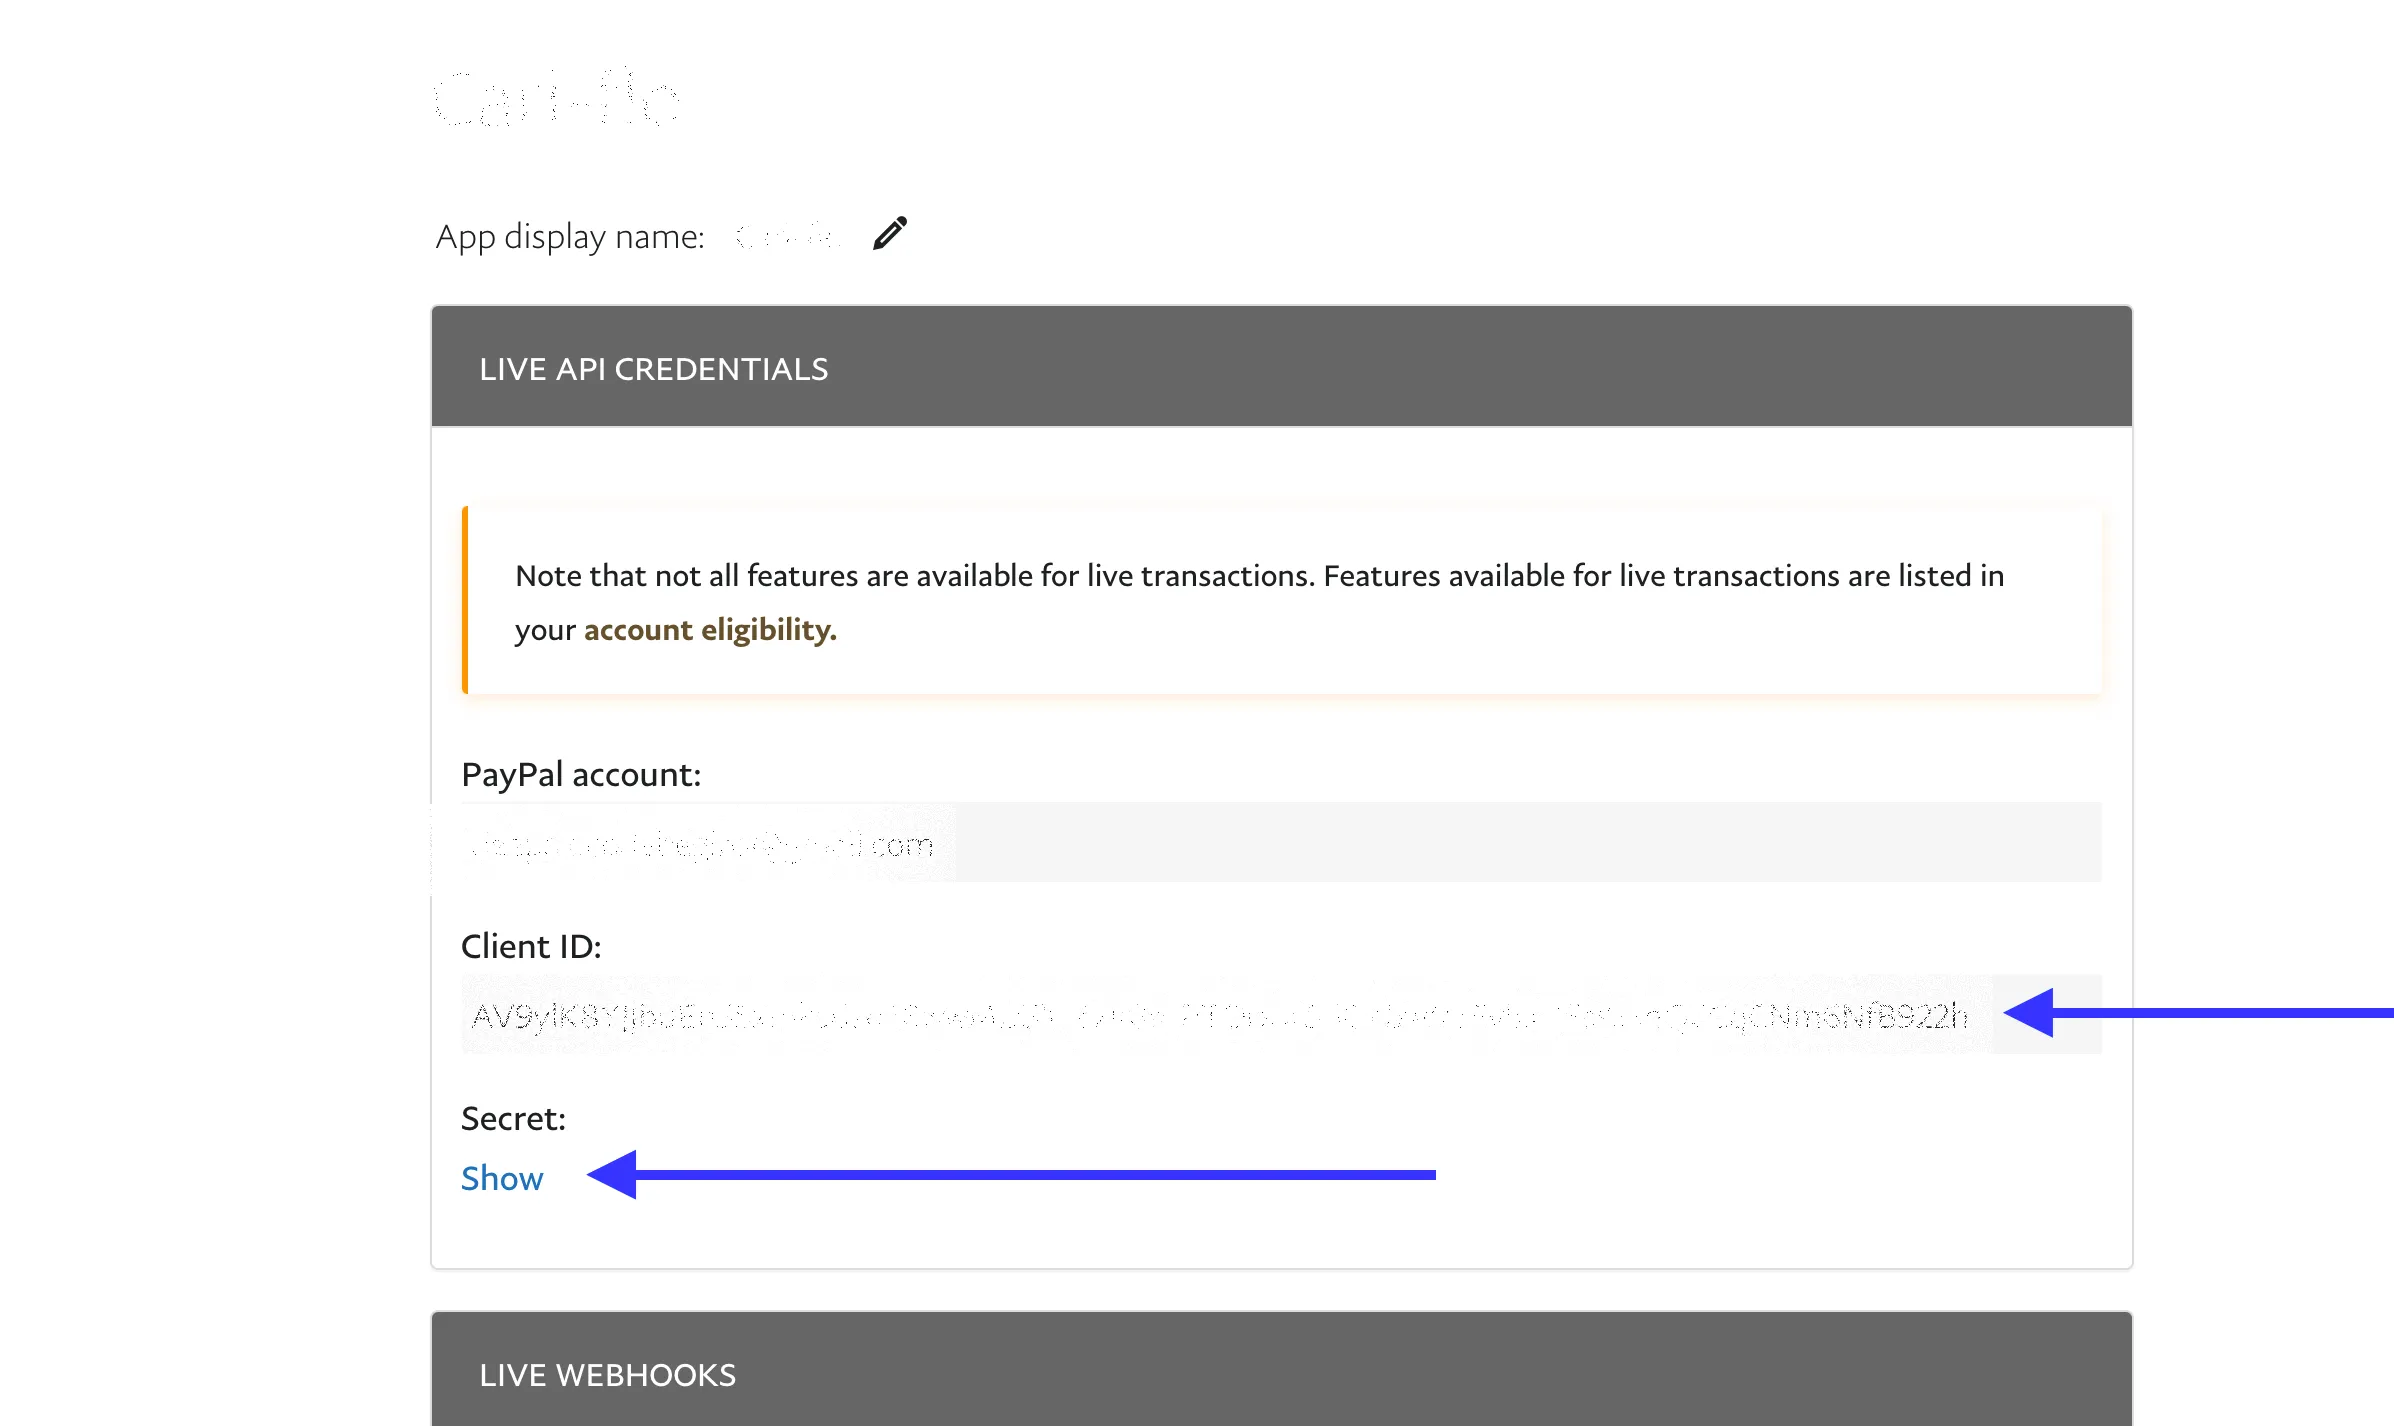
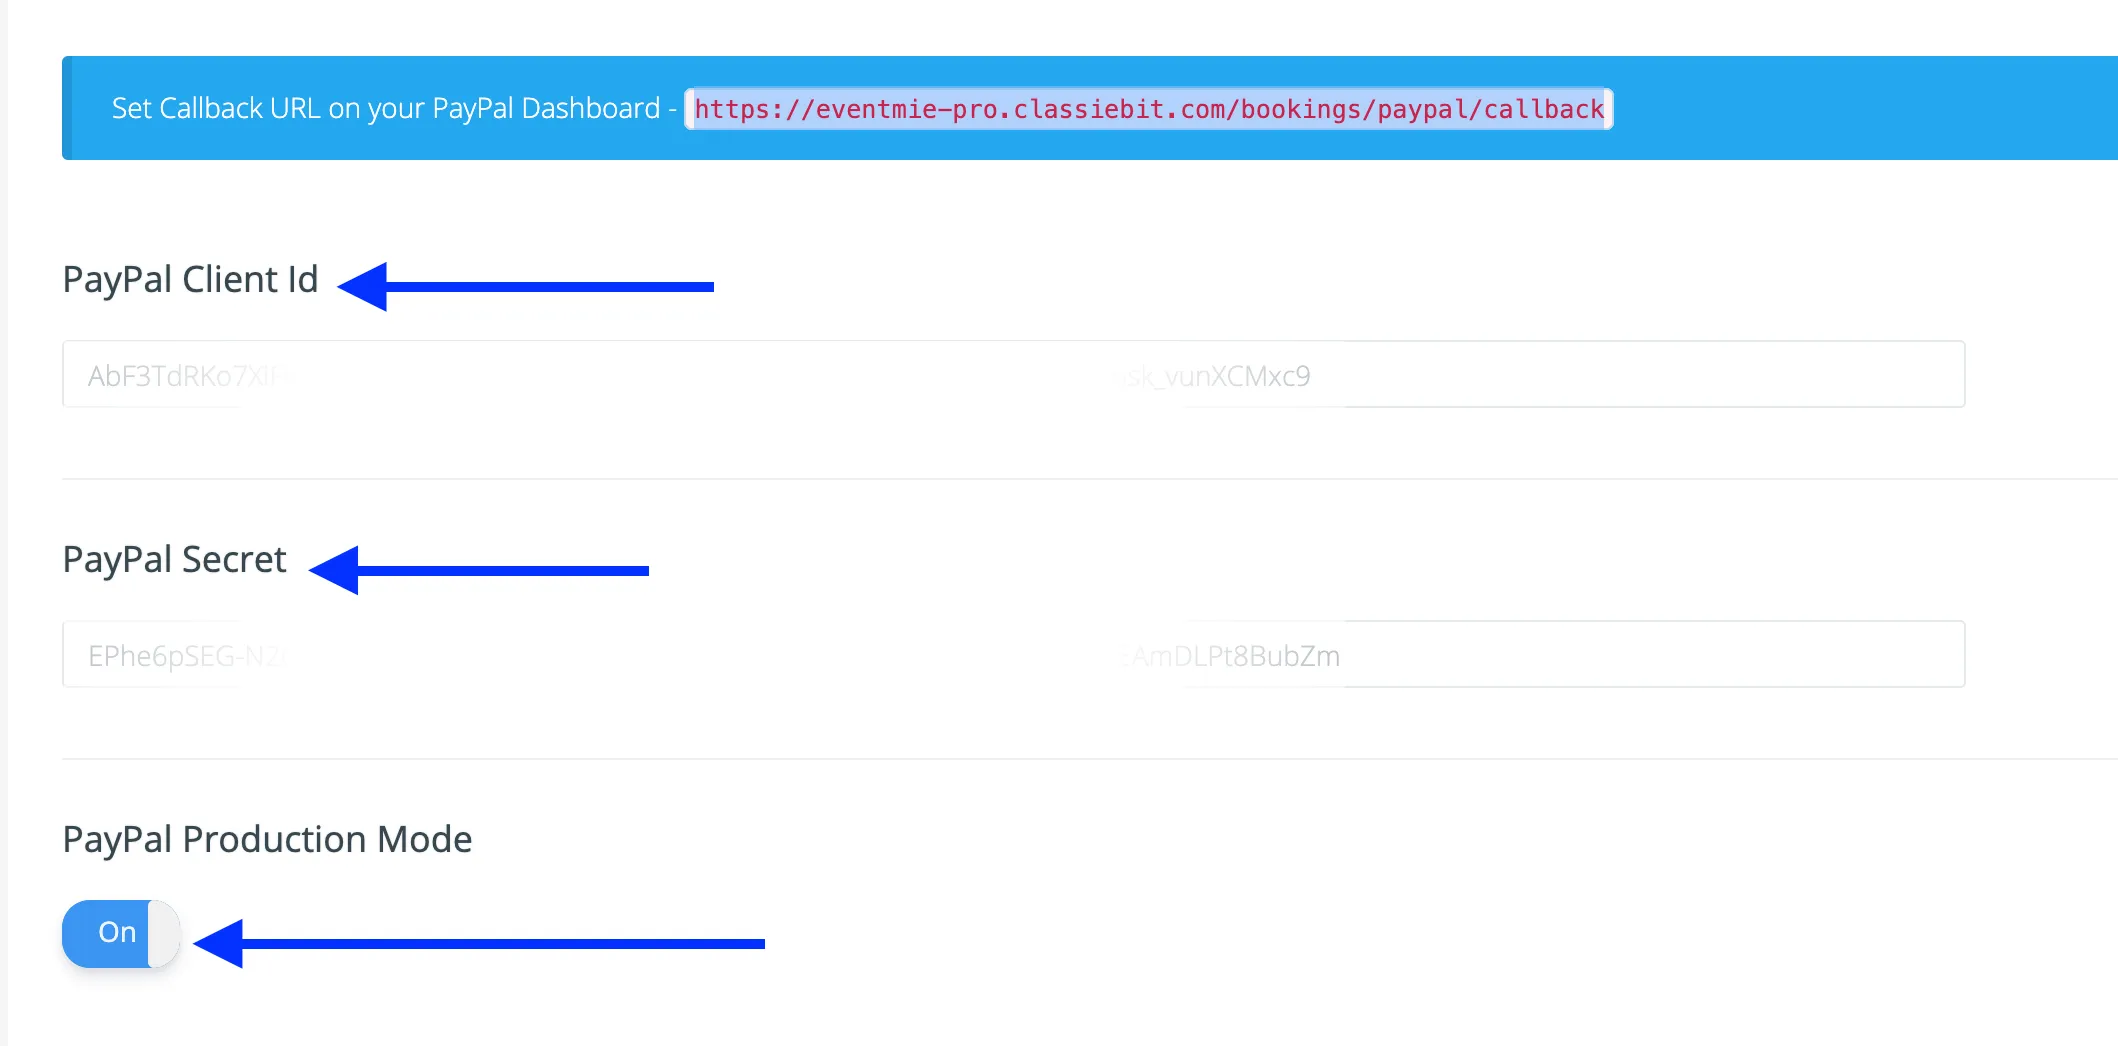
- And now, you can test the live payment on your website
-
Offline Payment
Offline payment means, booking a premium ticket without making an online payment. By default, the offline payment method is disabled. You need to enable it first. To get started with Offline Payment, simply-
- Go to
Admin Panel -> Settings -> Bookings Tab. - Turn on
Allow Offline Payment For Organizer&Allow Offline Payment For Customer. - You can turn on/off offline payment for Organizers & Customers separately, depending on your requirements.
{primary} Admin can always make a booking via the Offline Payment method.
Mail sending configurations
| Setting Name | Type | Description |
|---|---|---|
| Mail Driver | string |
Mail driver name e.g smtp |
| Mail Host | string |
Mail host e.g 127.0.0.1 |
| Mail Port | string |
Mail Port e.g 1025 |
| Mail Username | string |
Mail Username e.g testuser |
| Mail Password | string |
Mail Password e.g testpwd |
| Mail Encryption | list |
disable, SSL, TLS |
| Mail Sender Email | email |
Sender email e.g eventmie@classiebit.com |
| Mail Sender Name | string |
Sender Name e.g Eventmie |
Regional
Region-specific configurations.
| Setting Name | Type | Description |
|---|---|---|
| Timezone | list |
Choose your region-specific timezone |
| Currency | string |
Enter your default currency |
| Date Format | list |
Choose your default date format |
| Time Format | list |
Choose your default time format |
Auto Timezone Conversion from Server-side to Client-side & vice versa.
- Suppose the default timezone is
America/Los_Angelesand a customer visiting the website fromIndia/Kolkata, then the customer will see the date & time according toIndia/Kolkatatimezone by keepingAmerica/Los_Angeles(default selected Timezone) as the central timezone of the website.
{success} Eventmie Pro detects visitor's timezone and makes server-side to client-side DateTime conversions behind the scenes.